Docker Containers basics

What is Docker?

Docker is containerization platform.
What does that mean? Well, you can package your application in to a standardized unit for software development. Those standardized units are called containers. Containers can be shipped and run independently.

Docker container wraps a  piece of software in a complete filesystem that contains everything needed to run: code, runtime, system tools, system libraries – anything that can be installed on a server. This guarantees that software will always run the same, regardless of it’s environment.

Open Docker Containers

What do you mean by Open Docker Containers?
Well, Docker containers are based on open standards. That means, you can run docker containers on all major Linux distributions, even on Microsoft windows. You can run docker containers on any infrastructure. It includes but n0t limited to cloud providers i.e. AWS, GCE, Softlayer, Azure etc, virtual machines, On premise data centers etc.

Docker Containers vs Virtual Machines

Let’s try to understand it. You need infrastructure for both: virtual machines and Docker containers. Then of course you need Operating System on top of it. Now when it comes to virtual machines you need Hypervisor. On the other hand for Docker containers you don’t require Hypervisor but a binary called Docker Engine. Now in case of Virtual Machines you need dedicated Guest OS, Libraries and Binaries, dedicated computing resources etc. On the other hand, Docker containers run over Docker Engine. No Guest OS, dedicated libraries/binaries are required. Docker containers share Linux Kernel, RAM, Storage of Host system.

To summarize:

Virtual machines include the application, the necessary binaries and libraries, and an entire guest Operating System – all of which can amount to tens of GBs.

Container include the application and all the dependencies – but share the kernel with other containers, running as isolated process in user space on the host operating system. Docker containers are not tied to any specific Infrastructure: they run on any computer, or any infrastructure, and in any cloud.

Basic video :
kubernetes cluster on centos7

kubernetes is a system for managing containerized applications in a clustered environment. It provides basic mechanisms for deployment, maintenance and scaling of applications on public, private or hybrid setups. It also comes with self-healing features where containers can be auto provisioned, restarted or even replicated.

Kubernetes Components:

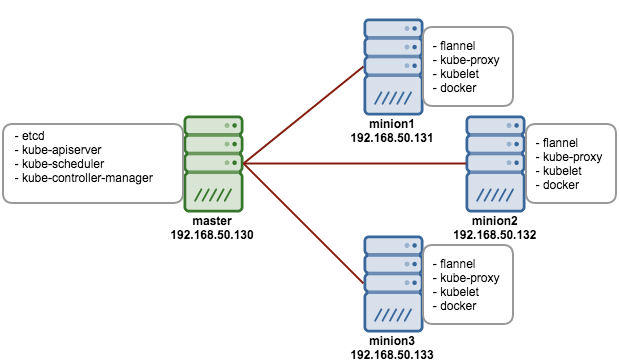
Kubernetes works in server-client setup, where it has a master providing centralized control for a number of minions. We will be deploying a Kubernetes master with three minions, as illustrated in the diagram further below.

Kubernetes has several components:

  • etcd – A highly available key-value store for shared configuration and service discovery.
  • flannel – An etcd backed network fabric for containers.
  • kube-apiserver – Provides the API for Kubernetes orchestration.
  • kube-controller-manager – Enforces Kubernetes services.
  • kube-scheduler – Schedules containers on hosts.
  • kubelet – Processes a container manifest so the containers are launched according to how they are described.
  • kube-proxy – Provides network proxy services.
    Deployment on CentOS 7
    We will need 4 servers, running on CentOS 7.1 64 bit with minimal install. All components are available directly from the CentOS extras repository which is enabled by default. The following architecture diagram illustrates where the Kubernetes components should reside:kube7-archPrerequisites1. Disable iptables on each node to avoid conflicts with Docker iptables rules

    $ systemctl stop firewalld
    $ systemctl disable firewalld

    2. Install NTP and make sure it is enabled and running:

    $ yum -y installntp
    $ systemctl start ntpd
    $ systemctl enablentpd

    3. Add an repo on all nodes.

    vim /etc/yum.repos.d/virt7-docker-common-release.repo
    [virt7-docker-common-release]
    name=virt7-docker-common-release
    baseurl=http://cbs.centos.org/repos/virt7-docker-common-release/x86_64/os/
    gpgcheck=0

    Setting up the Kubernetes Master

    The following steps should be performed on the master.

    1. Install etcd and Kubernetes through yum:
    $ yum -y install etcd kubernetes

    2. Configure etcd to listen to all IP addresses inside /etc/etcd/etcd.conf. Ensure the following lines are uncommented, and assign the following values:

    ETCD_NAME=default
    ETCD_DATA_DIR="/var/lib/etcd/default.etcd"
    ETCD_LISTEN_CLIENT_URLS="http://0.0.0.0:2379"

    ETCD_ADVERTISE_CLIENT_URLS="http://localhost:2379"

    3. Configure Kubernetes API server inside /etc/kubernetes/apiserver. Ensure the following lines are uncommented, and assign the following values:

    KUBE_API_ADDRESS="--address=0.0.0.0"
    KUBE_API_PORT="--port=8080"
    KUBELET_PORT="--kubelet_port=10250"
    KUBE_ETCD_SERVERS="--etcd_servers=http://127.0.0.1:2379"
    KUBE_SERVICE_ADDRESSES="--service-cluster-ip-range=10.254.0.0/16"
    KUBE_ADMISSION_CONTROL="--admission_control=NamespaceLifecycle,NamespaceExists,LimitRanger,SecurityContextDeny,ResourceQuota"

    KUBE_API_ARGS=""

    4. Start and enable etcd, kube-apiserver, kube-controller-manager and kube-scheduler:

    $ for SERVICES in etcd kube-apiserver kube-controller-manager kube-scheduler; do
        systemctl restart $SERVICES
        systemctl enable $SERVICES
        systemctl status $SERVICES

    done

    5. Define flannel network configuration in etcd. This configuration will be pulled by flannel service on minions:


    $etcdctl mk /kube-centos/network/config "{ \"Network\": \"172.30.0.0/16\", \"SubnetLen\": 24, \"Backend\": { \"Type\": \"vxlan\" } }"

    6. At this point, we should notice that nodes’ status returns nothing because we haven’t started any of them yet:

    $ kubectl get nodes

    NAME             LABELS              STATUS

    Setting up Kubernetes Minions (Nodes)

    The following steps should be performed on minion1, minion2 and minion3 unless specified otherwise.

    1. Install flannel and Kubernetes using yum:

    $ yum -y install flannel kubernetes

    2. Configure etcd server for flannel service. Update the following line inside /etc/sysconfig/flanneld to connect to the respective master:

    FLANNEL_ETCD="http://192.168.50.130:2379"

    3. Configure Kubernetes default config at /etc/kubernetes/config, ensure you update the KUBE_MASTER value to connect to the Kubernetes master API server:

    KUBE_MASTER="--master=http://192.168.50.130:8080"

    4. Configure kubelet service inside /etc/kubernetes/kubelet as below:
    minion1:

    KUBELET_ADDRESS="--address=0.0.0.0"
    KUBELET_PORT="--port=10250"
    # change the hostname to this host’s IP address
    KUBELET_HOSTNAME="--hostname_override=192.168.50.131"
    KUBELET_API_SERVER="--api_servers=http://192.168.50.130:8080"
    KUBELET_ARGS=""
    minion2:
    KUBELET_ADDRESS="--address=0.0.0.0"
    KUBELET_PORT="--port=10250"
    # change the hostname to this host’s IP address
    KUBELET_HOSTNAME="--hostname_override=192.168.50.132"
    KUBELET_API_SERVER="--api_servers=http://192.168.50.130:8080"
    KUBELET_ARGS=""
    minion3:
    KUBELET_ADDRESS="--address=0.0.0.0"
    KUBELET_PORT="--port=10250"
    # change the hostname to this host’s IP address
    KUBELET_HOSTNAME="--hostname_override=192.168.50.133"
    KUBELET_API_SERVER="--api_servers=http://192.168.50.130:8080"
    KUBELET_ARGS=""

    5. Start and enable kube-proxy, kubelet, docker and flanneld services:

    $ for SERVICES in kube-proxy kubelet docker flanneld; do
        systemctl restart $SERVICES
        systemctl enable $SERVICES
        systemctl status $SERVICES

    done

    6. On each minion, you should notice that you will have two new interfaces added, docker0 and flannel0. You should get different range of IP addresses on flannel0 interface on each minion, similar to below:
    minion1:

[root@kube-minion1 ~]# ip a | grep flannel | grep inet
inet 172.30.79.0/32 scope global flannel.1
[root@kube-minion1 ~]#

minion1:

[root@kube-minion2 ~]# ip a | grep flannel | grep inet
inet 172.30.92.0/32 scope global flannel.1
[root@kube-minion2 ~]#

  1. Now login to Kubernetes master node and verify the minions’ status:
$ kubectl get nodes
NAME             LABELS                                  STATUS
192.168.50.131   kubernetes.io/hostname=192.168.50.131   Ready
192.168.50.132   kubernetes.io/hostname=192.168.50.132   Ready

192.168.50.133   kubernetes.io/hostname=192.168.50.133   Ready

kubernetes Basic Terminology

Kubernetes is an open source container management system that allows the deployment, orchestration, and scaling of container applications and micro-services across multiple hosts.

A single master host will manage the cluster and run several core Kubernetes services.

API Server – The REST API endpoint for managing most aspects of the Kubernetes cluster.
Replication Controller – Ensures the number of specified pod replicas are always running by starting or shutting down pods.

Scheduler – Finds a suitable host where new pods will be reside.
etcd – A distributed key value store where Kubernetes stores information about itself, pods, services, etc.

Flannel – A network overlay that will allow containers to communicate across multiple hosts.
The minion hosts will run the following services to manage containers and their network.

Kubelet – Host level pod management; determines the state of pod containers based on the pod manifest received from the Kubernetes master.
Proxy – Manages the container network (IP addresses and ports) based on the network service manifests received from the Kubernetes master.

Docker – An API and framework built around Linux Containers (LXC) that allows for the easy management of containers and their images.

Flannel – A network overlay that will allow containers to communicate across multiple hosts.
Note: Flannel, or another network overlay service, is required to run on the minions when there is more than one minion host. This allows the containers which are typically on their own internal subnet to communicate across multiple hosts. As the Kubernetes master is not typically running containers, the Flannel service is not required to run on the master.
Pods

It’s the basic unit of Kubernetes workloads. A pod models an application-specific “logical host” in a containerized environment. In layman terms, it models a group of applications or services that used to run on the same server in the pre-container world. Containers inside a pod share the same network namespace and can share data volumes as well.

Replication controllers(RC)
Pods are great for grouping multiple containers into logical application units, but they don’t offer replication or rescheduling in case of server failure.

This is where a replication controller or RC comes handy. A RC ensures that a number of pods of a given service is always running across the cluster.

Services
Pods and replication controllers are great for deploying and distributing applications across a cluster, but pods have ephemeral IPs that change upon rescheduling or container restart.

A Kubernetes service provides a stable endpoint (fixed virtual IP + port binding to the host servers) for a group of pods managed by a replication controller.

Kubernetes cluster
In its simplest form, a Kubernetes cluster is composed by two types of nodes:

1 Kubernetes master.
N Kubernetes nodes.

Kubernetes master

The Kubernetes master is the control unit of the entire cluster.

The main components of the master are:

Etcd: a globally available datastore that stores information about the cluster and the services and applications running on the cluster.
Kube API server: this is main management hub of the Kubernetes cluster and it exposes a RESTful interface.
Controller manager: handles the replication of applications managed by replication controllers.
Scheduler: tracks resource utilization across the cluster and assigns workloads accordingly.
Kubernetes node

The Kubernetes node are worker servers that are responsible for running pods.

The main components of a node are:

Docker: a daemon that runs application containers defined in pods.
Kubelet: a control unit for pods in a local system.
Kube-proxy: a network proxy that ensures correct routing for Kubernetes services.

Install go language and build benchmark Tool

Steps to install go and build benchmark tool.

  1. Download go using “wget https://storage.googleapis.com/golang/go1.8.3.linux-amd64.tar.gz”
  2. Extract it in /usr/local
    sudo tar -C /usr/local -xzf go1.8.3.linux-amd64.tar.gz

  3. Set following variables in profile file
    export GOROOT=/usr/local/go
    export GOPATH=$HOME/gowork
    export PATH=$PATH:$GOPATH/bin:/usr/local/go/bin
    source ~/.bashrc

  4. Create following directories
    mkdir -p $HOME/gowork
    mkdir -p $HOME/gowork/src

  5. Go to $GOPATH

  6. Run
    go get github.com/coreos/etcd/tools/benchmark

the cd src/github.com/coreos/etcd/tools/benchmark

  1. Build benchmark
    go build -o benchmark
    It will create on executable ‘benchmark’ in $GOPATH/src/github.com/coreos/etcd/tools/benchmark

You can use this tool to do benchmarking

Links for Benchmarking.

https://github.com/coreos/etcd/blob/master/Documentation/op-guide/performance.md